Coxinha
“In cooking, as in all the arts, simplicity is the sign of perfection.”
-Curnonsky
The first time I heard of coxinha, the conversation went a little like this:
“Let’s stop here and get coxinha.” “What’s coxinha?” “It’s a type of salgadinho…” “….a what?” ” You just… have to eat it. Alex, YOU explain…”
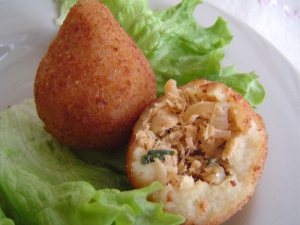
Honestly, though, Alex’s sister-in-law was right – you just have to eat it. Trying to verbally explain what the heck coxinhas are is pretty difficult, and can lead to a lot of blank stares. You need pictures, or you need to eat one 🙂
In Portuguese, coxinha (pronounced co-SHEEN-yah) literally means “little thigh,” and it’s the way people generally refer to chicken drumsticks. The predecessor to the coxinha was called a coxa creme and was made out of battered and fried chicken thighs – hence the name. Somewhere along the way, the thigh was deboned and shredded and these little teardrop shaped goodies became a lanchonette (snack shop – like a very simple Brazilian diner that offers a limited menu and usually fresh juice and coffee) staple and an absolute necessity during or after a night of caipirinhas.
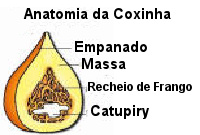
A coxinha is basically shredded, seasoned chicken and Catupiry cheese, wrapped in a roux-like batter, formed to vaguely resemble a drumstick, then breaded and deep-fried. They’re a traditional appetizer at parties. They’re incredibly popular snacks throughout the day, probably because they’re cheap, filling, easy to eat while walking, and delicious. I’ve actually heard some pretty spirited discussions regarding the “proper” way to eat a coxinha – should you start from the base, like an ice cream cone, or should you start from the tip? Many people argue that if you start from the base, the last bite is all batter, which is a good thing – I think it’s just as good if you end up with the filling as the last bite 🙂
After reading a bunch of recipes (all of which were totally different, of course!), I decided to make coxinha for a party that one of Alex’s cousins was having. The recipes all had essentially the same process, so I followed the method and made my own variation on seasoning and such. They were not difficult to make, but I was surprised at how incredibly time-consuming they are! All in all, it took me about 8 hours to end up with about 100 or so of these little things. Granted, I didn’t take the shortcuts (I made my own stock instead of using bouillon cubes), but still – shredding an entire chicken is a lot of work :p
Coxinhas
- 1 whole chicken, cut into large (5-6) pieces – try to also get the feet if you can.
- diced onion, celery, and carrot, plus herb stems if available (homemade stock) or 2-3 bouillon cubes
- 2-3 bay leaves
- about 2T each of minced parsley and basil
- 5-6 t. minced garlic
- anything else you want to add to the filling – I used 6-7 black olives and about 1/2c. of leftover fresh salsa (tomatoes, red onions, lime juice, red pepper)
- about 8oz. of Catupiry cheese – if you can’t find Catupiry, use softened cream cheese whipped with a little cream or Mascarpone cheese
- paprika
- salt and pepper
- 2 large potatoes (cooked, peeled, and mashed)
- 3c. homemade chicken stock (or cheat and use really flavorful bouillon cubes)
- 4T. butter
- 4-5 c. flour for the dough plus 1c. extra for breading
- 2 c. milk for the dough+ a little extra to mix with the beaten egg
- 2 eggs
- 3-ish cups of finely ground breadcrumbs
First, if you’re making your own stock (recommended), start that first. Over medium heat, brown the chicken pieces evenly and render the fat off the skin. Sweat the onions, carrot, and celery and cover everything with water. Add the bay leaf, any herb/vegetable scraps you have laying around, and simmer for about 40 minutes, until the chicken is nice and tender. Remove the chicken and de-bone it. Put the bones, skin, scraps, etc. back into the stock and simmer for up to 4 hours – the longer you simmer it, the more concentrated the flavor will be (if you have the feet, it’ll make the stock extra gelatinous and delicious). In the meantime, shred the chicken meat and boil and mash the potatoes. Chop all the garnish for your filling (another great way to use up extra leftovers!).
Strain and degrease your stock. If you opted out of making stock, just poach the chicken in water with a couple bouillon cubes dissolved in it. Save the liquid.
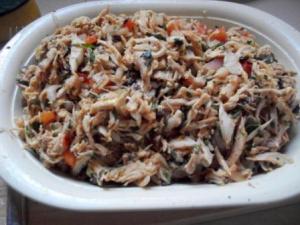
Mix the chicken with all the fillings. Season well with garlic, paprika, salt, pepper – anything, really. Add a little bit of your warm stock to keep the chicken moist.
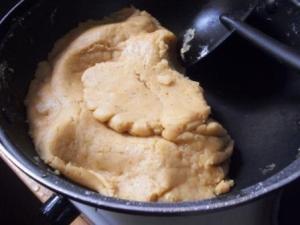
In a large saute pan, heat about 4 c. of your stock, the milk, and the butter. Add the mashed potatoes and mix until there aren’t any lumps left. Sift the flour and sprinkle it on top of the warm liquid mixture. Working quickly, incorporate the flour into the liquid with a wooden spoon. It should start forming a dough pretty quickly – you don’t want to actually cook it like a roux though. As soon as the dough begins to pull away from the pan (helpful to use nonstick here), take it off the heat and let it cool.
When the dough gets to a workable temperature, knead it briefly and form it into little balls (about 2 tablespoons for mini coxinhas, an ice cream scoop for large ones). It helps to butter or oil your hands at this point. The dough should be slightly sticky. I made two batches of dough (underestimated the amount the chicken would fill); in the first batch, I used a ton of the grease from the stock, thinking it would add to the richness and flavor of the dough. It tasted great, but it wasn’t the right consistency for this application – less grease is better. Also, not all recipes call for mashed potatoes – but I like the way these turned out and think the texture it adds is really good.
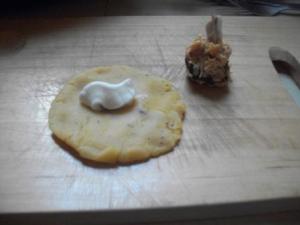
Flatten the dough into a circle. In the center of your palm, press down until you make a little indentation in the dough. Put a little bit of the cream cheese in the indentation, and then fill with your chicken mixture. Close it like an empanada, but make sure to press all the air out of it. You should end up with extra dough on both sides of it – pinch it off (I wasn’t too awesome at this step at first, so a lot of the extra dough was made into little “band-aids” to fix the holes I somehow kept making in the dough, haha). Form it so it vaguely resembles a drumstick.
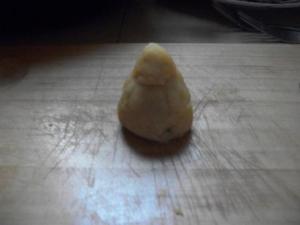
Several of the recipes I read said to reserve a small strip of chicken meat, squish a ball of the filling around it, and put it into the dough like that – I found that incredibly annoying and eventually gave up after the first dozen. Alex said the first few looked like Native American “teepees” rather than drumsticks 🙂
While you’re forming and stuffing them, I recommend freezing them as you go. I would make a dozen, put them in the freezer, make another dozen, freeze them, etc. It makes them easier to work with.
Next, set up for a standard breading procedure. Have a bowl with flour, a bowl with beaten egg and milk, and a bowl with seasoned breadcrumbs all ready. Roll the chilled coxinhas in the flour, then dip into the egg mixture. I repeated this step so the crust would be a little thicker. Finally, roll in breadcrumbs and keep them cold until you’re ready to fry them. (I read that they keep in the refrigerator about 3 days and the freezer up to a month if sealed properly)
Fry them in hot oil. Start with the oil at a high temperature, but lower it once you add the coxinhas – you want the outside to brown and the inside to get nice and hot. Transfer to a paper towel, lightly sprinkle with salt, and enjoy while they’re still hot!
My coxinhas were a hit at the party. I couldn’t fry them fast enough… if I may say so, they were pretty damn good for a gringa! Alex said that the first batch was a bit too airy, but he still ate at least half a dozen of them… so obviously it wasn’t too bad. 🙂
In his book, Alex Atala has a recipe for liquid coxinhas. The procedure is essentially the same, but the filling is made with a super-concentrated roasted chicken broth thickened with gelatin. The gelatin is chilled and formed into drumstick shapes, then wrapped in the dough, breaded, and fried. The presentation is pretty cool.
I was also thinking about how this could be a really awesome way to use up thanksgiving leftovers – I’m definitely going to try it this year. You could make your own breadcrumbs out of leftover stuffing, use thinned-out gravy to make the dough, and stuff it with turkey and cranberry – it’ll be a fun experiment nonetheless.



These definitely sound yummy! Are you going to be home to make them for Thanksgiving?? :0) While I probably won’t be taking the time to make them myself, I would definitely be a willing “guinea pig” and try yours!! haha
Love and miss you!
Mom
Haha, how far away is Thanksgiving? Definitely too far to say where I’ll be. You know, you can always come visit me… I managed to pull off a tropical Thanksgiving last year =)
You could make them for the old people at work… I’m sure they’d go over well!
Miss you too!
There is also another traditional Brazilian “salgadinho” made with the same dough that is called “risolis”. It is stuffed with ham and cheese and shaped to look like a half-circle. The coxinha, although traditionally made with chicken is also sometimes found with ground beef or palmito and cheese filling.
Yes Alex and another thing that is inside risolis is schrimps, “Risolis de camarão” is a caloric bomb delicious with the brazilian sparkling wine. Oh yes!!!!
The only thing better than the coxhina, at least in my opinion, is the frango com catupiry pizza. In the years that I lived in Osasco, my only regret is not eating more catupiry. I’ve been looking for a good coxhina recipie, so I’ll have to try yours. Parabens no blog, e fiquem sempre felizes!
Hi! I want to make these for a Brazilian friend’s baby shower, and I am wondering if you deep fry them and THEN freeze them. When you are ready to serve, you can heat them in the oven . . .
Thanks!
Hi Jennifer! If you’re going to make them ahead, assemble them but don’t fry them. They’ll hold in the freezer for several weeks. When you’re ready to serve them, either fry them the day of the shower, or up to a day before – but keep them in the refrigerator. They can be reheated in the oven perfectly fine. 🙂